
dbt Data Modeling
Learn how to build robust data transformation pipelines using dbt with Tacnode, featuring best practices for modern data warehouse modeling and testing.
In today’s data-driven business landscape, organizations require efficient and flexible systems for data analysis and decision-making. Modern data warehouses must support rapid iteration while maintaining data quality and reliability. dbt (Data Build Tool) is a powerful data transformation framework designed specifically for modern data modeling, testing, and deployment.
By combining dbt’s transformation capabilities with Tacnode’s distributed storage and compute advantages, you can create a robust, flexible, and maintainable data warehouse ecosystem. This guide walks you through building data pipelines from initial setup to production deployment.
Prerequisites
Before getting started, ensure you have the following tools installed:
Required Software
- Python 3 - Download from Python.org or use your system package manager
- Git - Download from Git-scm.com or use your system package manager
- VS Code - Download from Visual Studio Code
Installing dbt
Install dbt with PostgreSQL support using pip:
pip3 install dbt-core dbt-postgresdbt Core Concepts
Understanding these fundamental concepts is essential for effective dbt modeling:
Configuration Files
schema.yml- Defines table metadata including descriptions, tags, and test configurationsprofiles.yml- Contains database connection settings and environment configurations
Data Sources
- Seeds - Load CSV files for dimension tables or small reference datasets
- Sources - Define external tables (structure and data managed outside dbt)
- Models - SQL-based transformations that create new tables or views
Key Functions
source()- Establishes lineage between models and source tablesSELECT * FROM {{ source('public', 'orders') }};ref()- Creates dependencies between models for proper execution orderSELECT * FROM {{ ref('staging_orders') }};
Configuration Examples
Database Schema Definition
Create comprehensive metadata definitions in your schema.yml files:
version: 2

sources:
  - name: jaffle_shop
    database: example
    schema: public
    tags: ['raw', 'source']
    tables:
      - name: raw_customers
        description: 'Raw customer data from the operational system'
        columns:
          - name: id
            description: 'Unique customer identifier'
            tests:
              - not_null
              - unique
          - name: first_name
            description: 'Customer first name'
            tests:
              - not_null

models:
  - name: dim_customers
    description: 'Customer dimension table with cleaned and standardized data'
    columns:
      - name: customer_id
        description: 'Primary key for customer dimension'
        tests:
          - unique
          - not_null
      - name: customer_name
        description: 'Standardized customer name'
        tests:
          - not_null

seeds:
  - name: raw_customers
    description: 'Raw customer reference data'
    columns:
      - name: id
        type: integer
        description: 'Customer ID'
        tests:
          - not_null
          - unique
      - name: first_name
        type: text
        description: 'Customer first name'
        tests:
          - not_null
Data Lineage Management
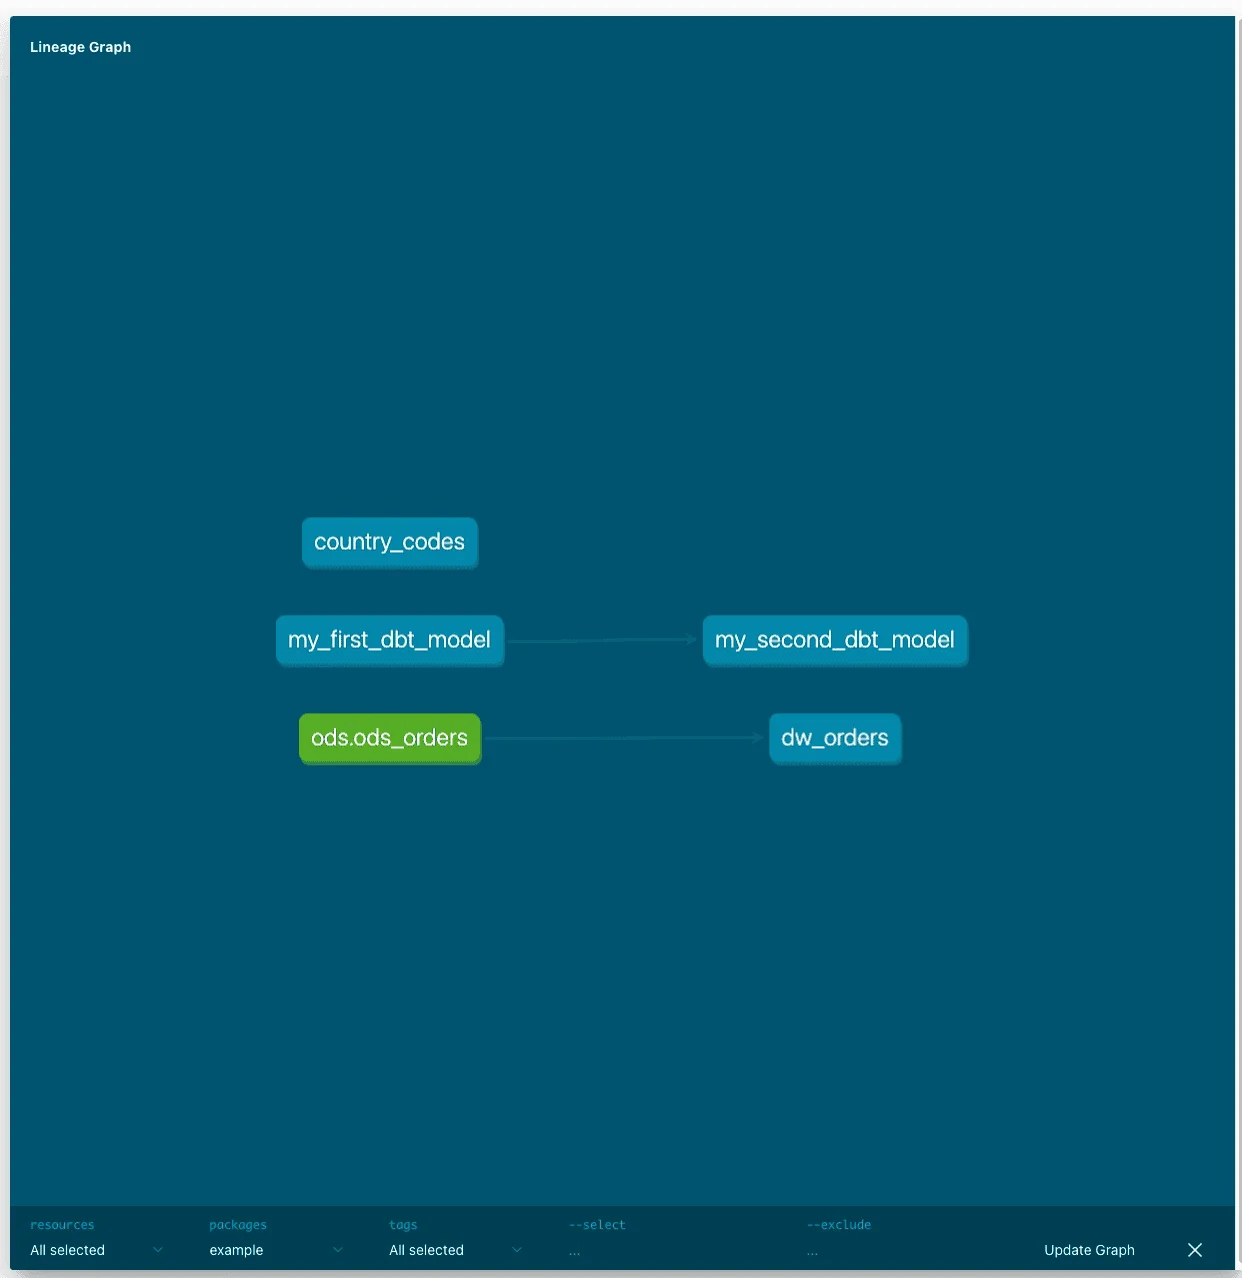
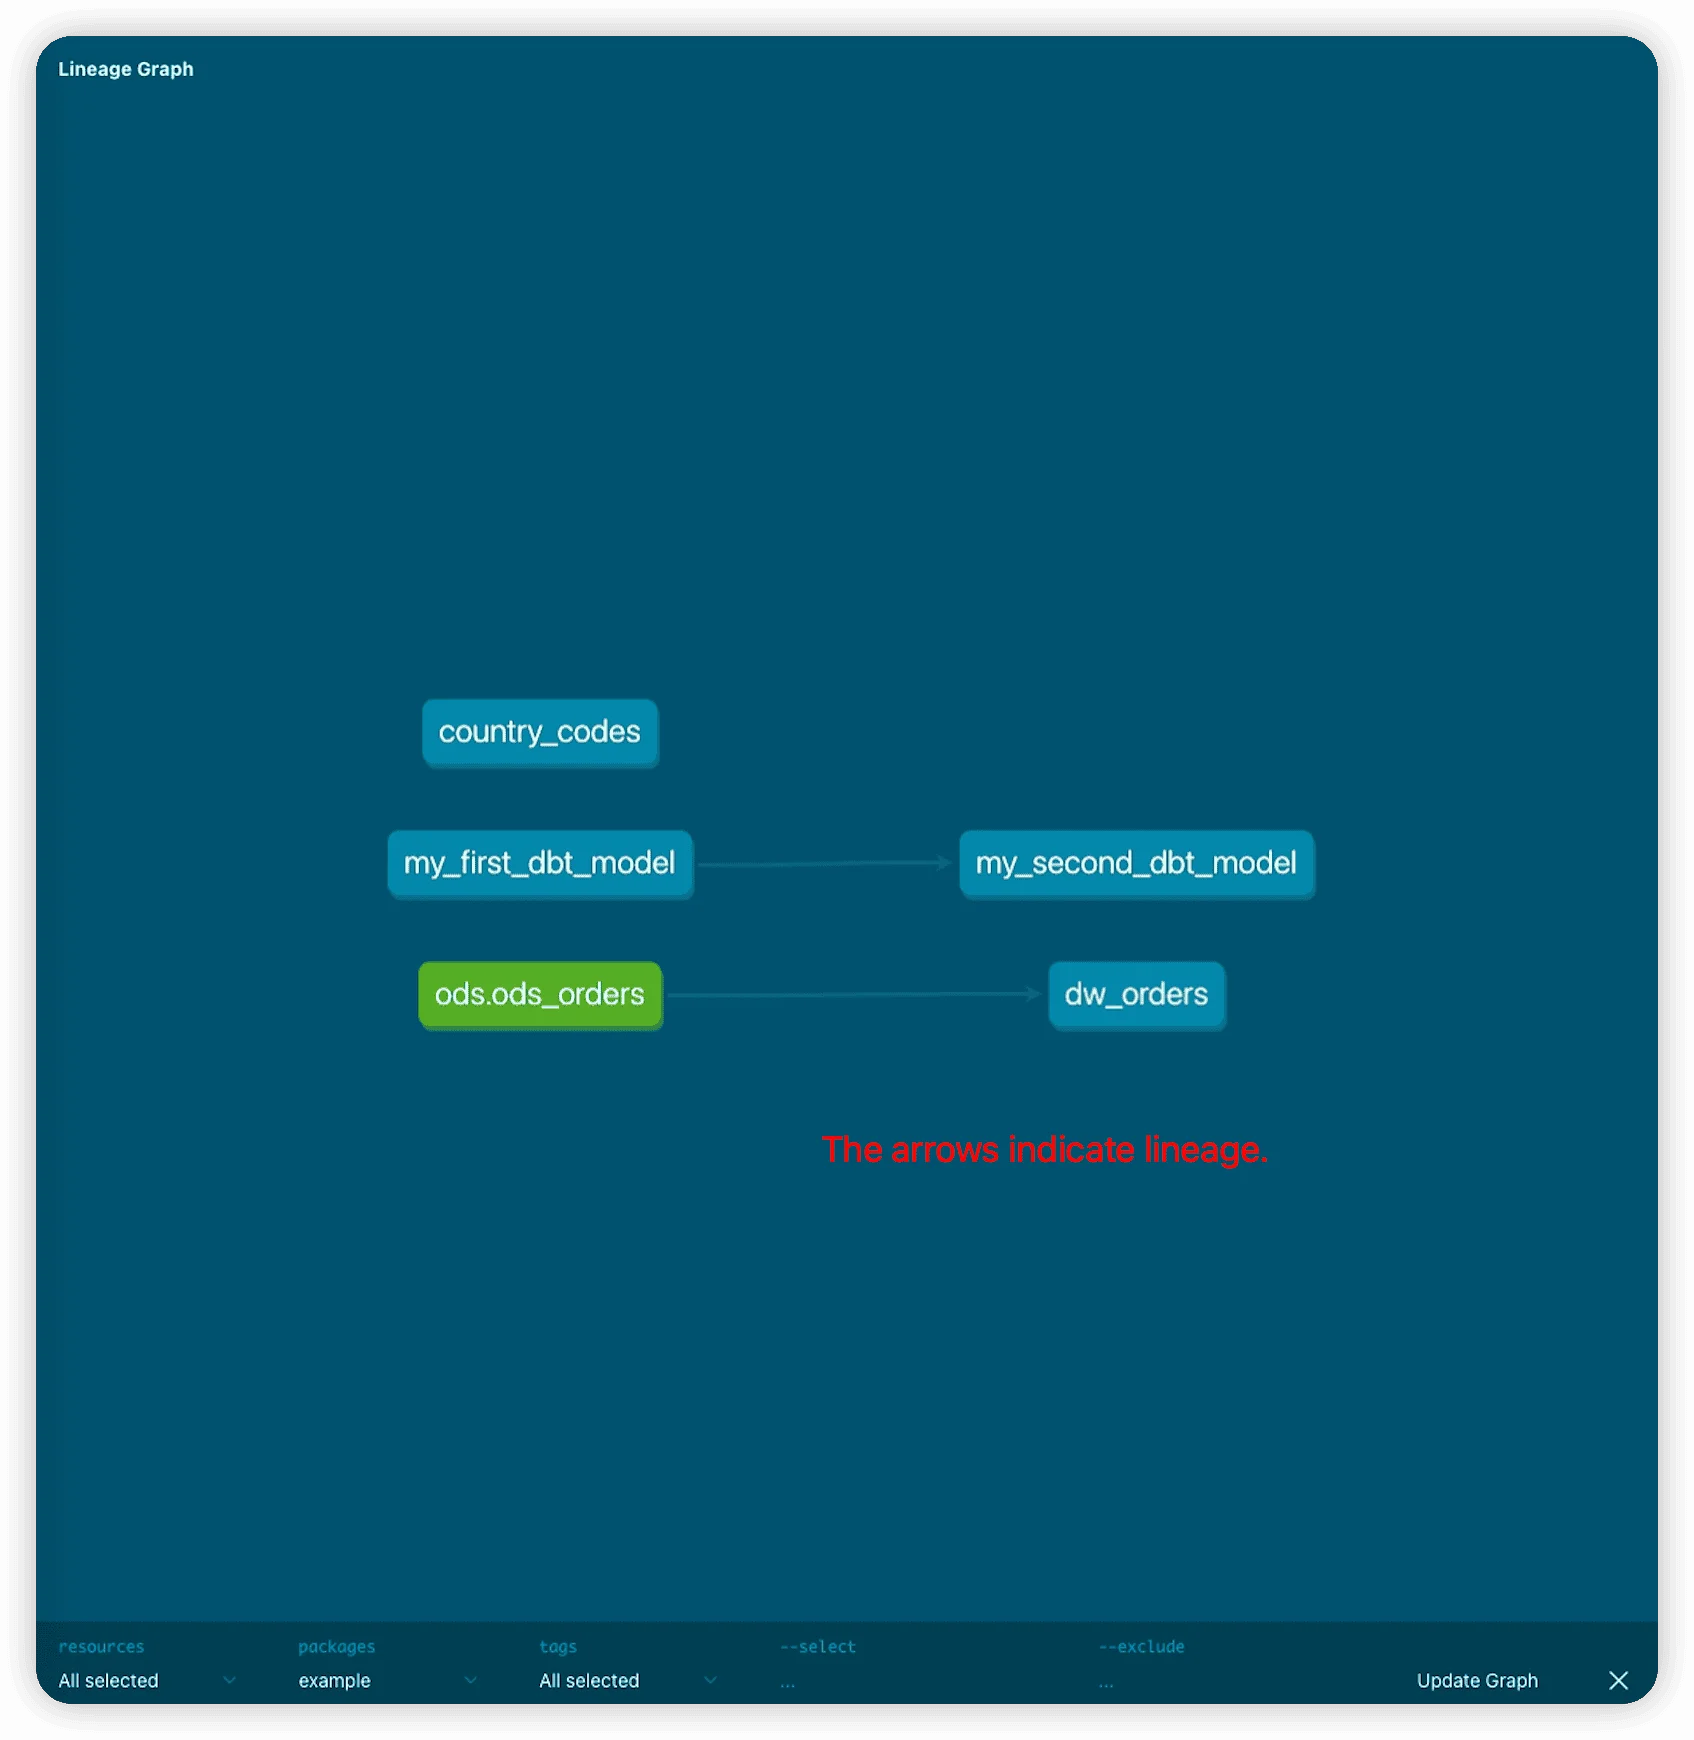
dbt automatically generates lineage diagrams based on source() and ref() function usage, providing clear visibility into data dependencies and transformation flows.
Hands-On Tutorial
This tutorial uses the Jaffle Shop sample project, a fictional ecommerce store dataset maintained by dbt Labs.
Project Initialization
Create and initialize a new dbt project:
# Create new dbt project
dbt init jaffle_shop

# Navigate to project directory
cd jaffle_shop

# Initialize git repository
git init
git add .
git commit -m 'Initial dbt project setup'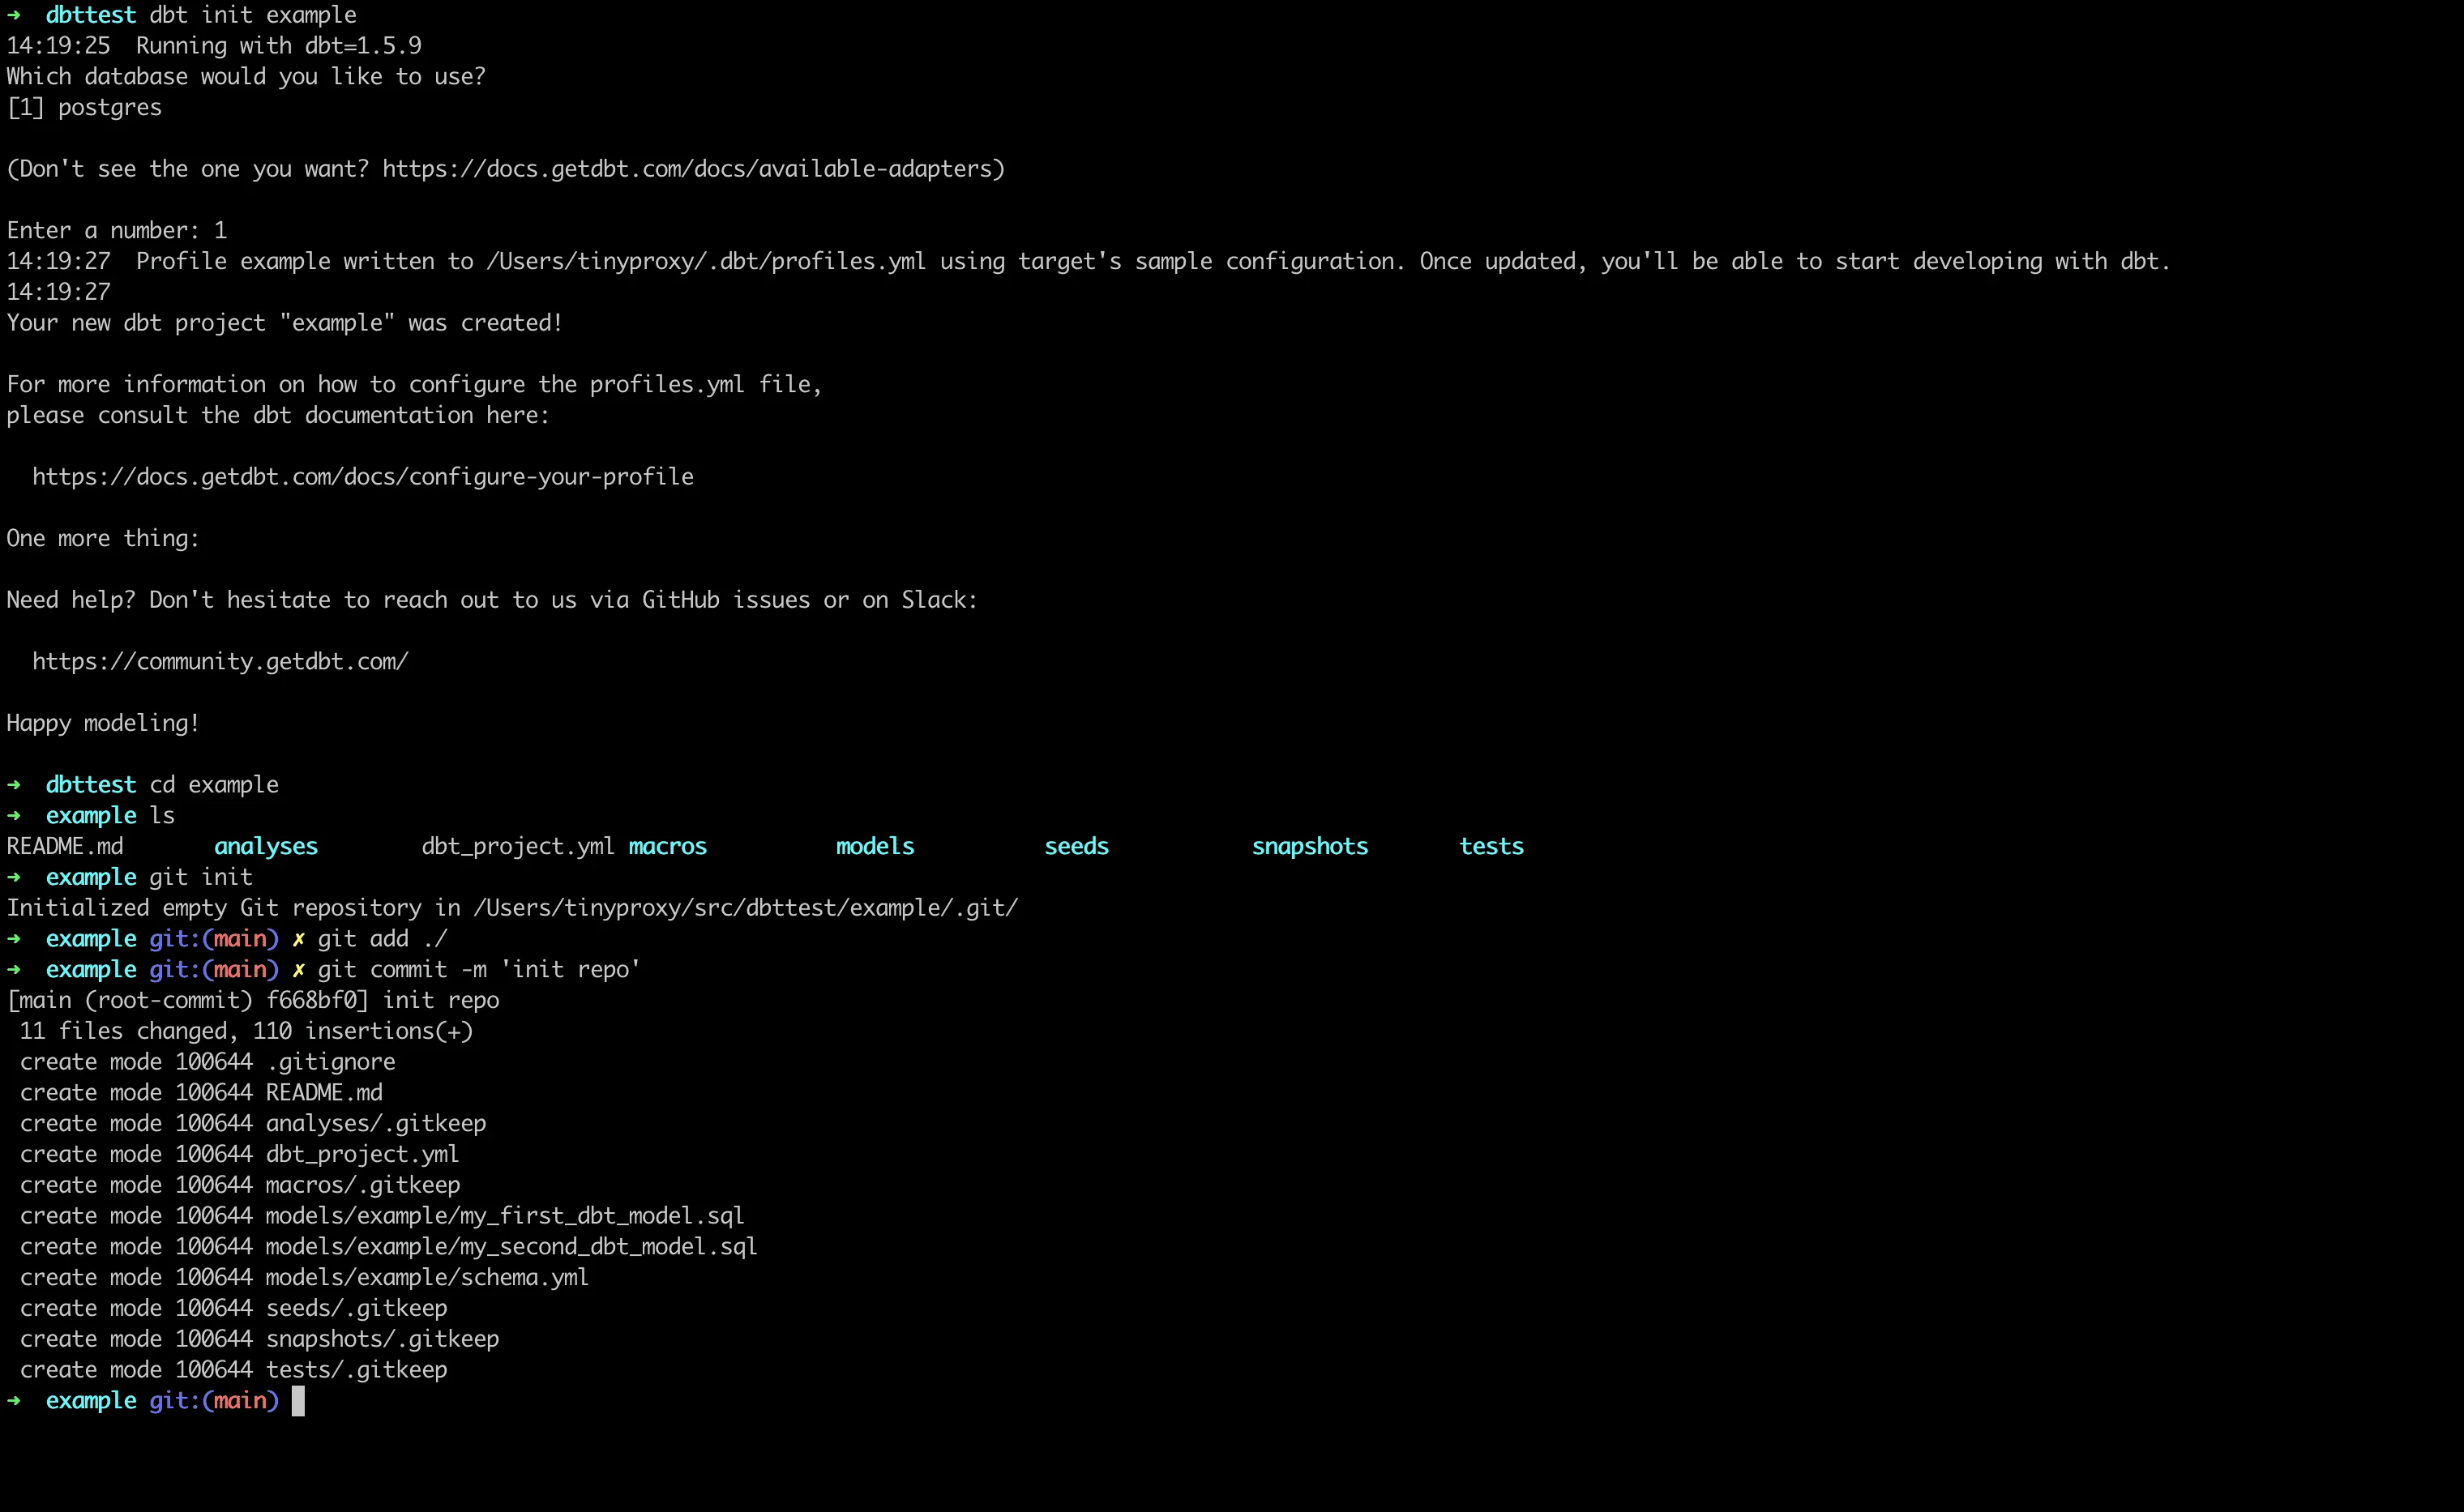
Running Built-in Examples
Execute the default models and tests to verify your setup:
# Run all models
dbt run

# Execute all tests
dbt test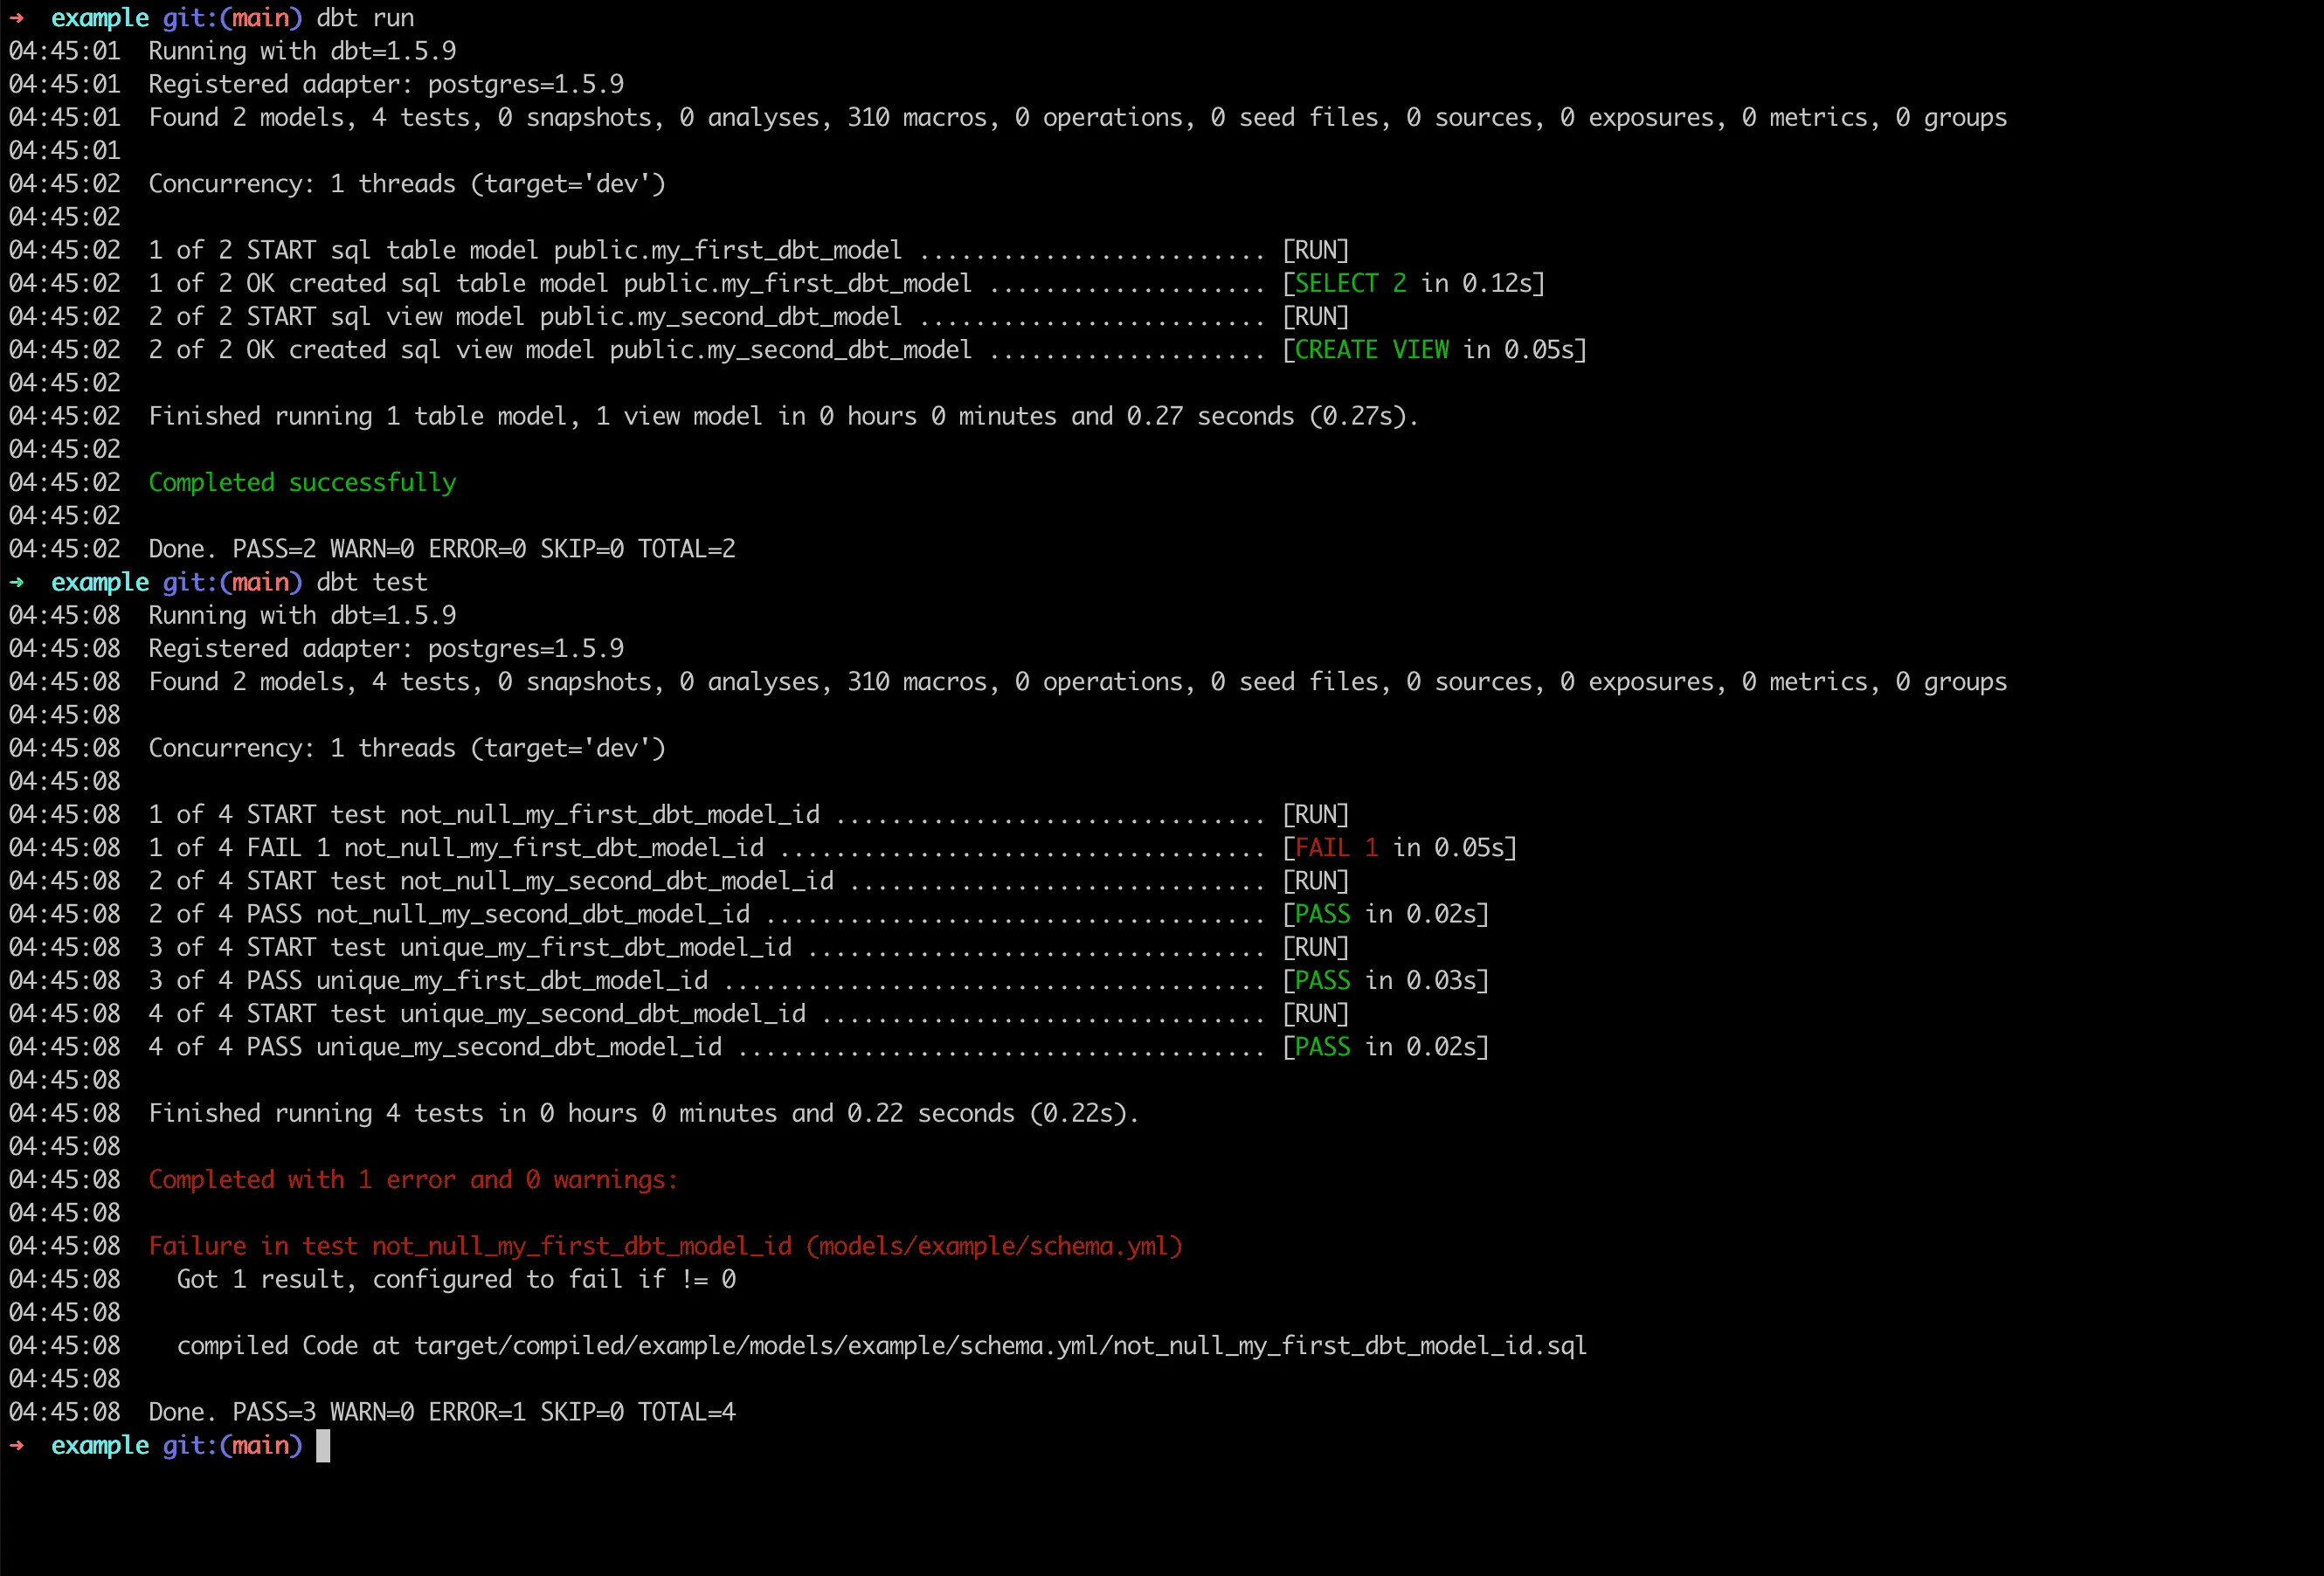
Troubleshooting Test Failures:
If you encounter test failures like not_null_my_first_dbt_model_id, check the model definition. The issue is typically in models/example/my_first_dbt_model.sql where line 16 generates a NULL value.
Solution: Uncomment line 27 by changing -- where id is not null to where id is not null.
After fixing, run the commands again:
dbt run && dbt test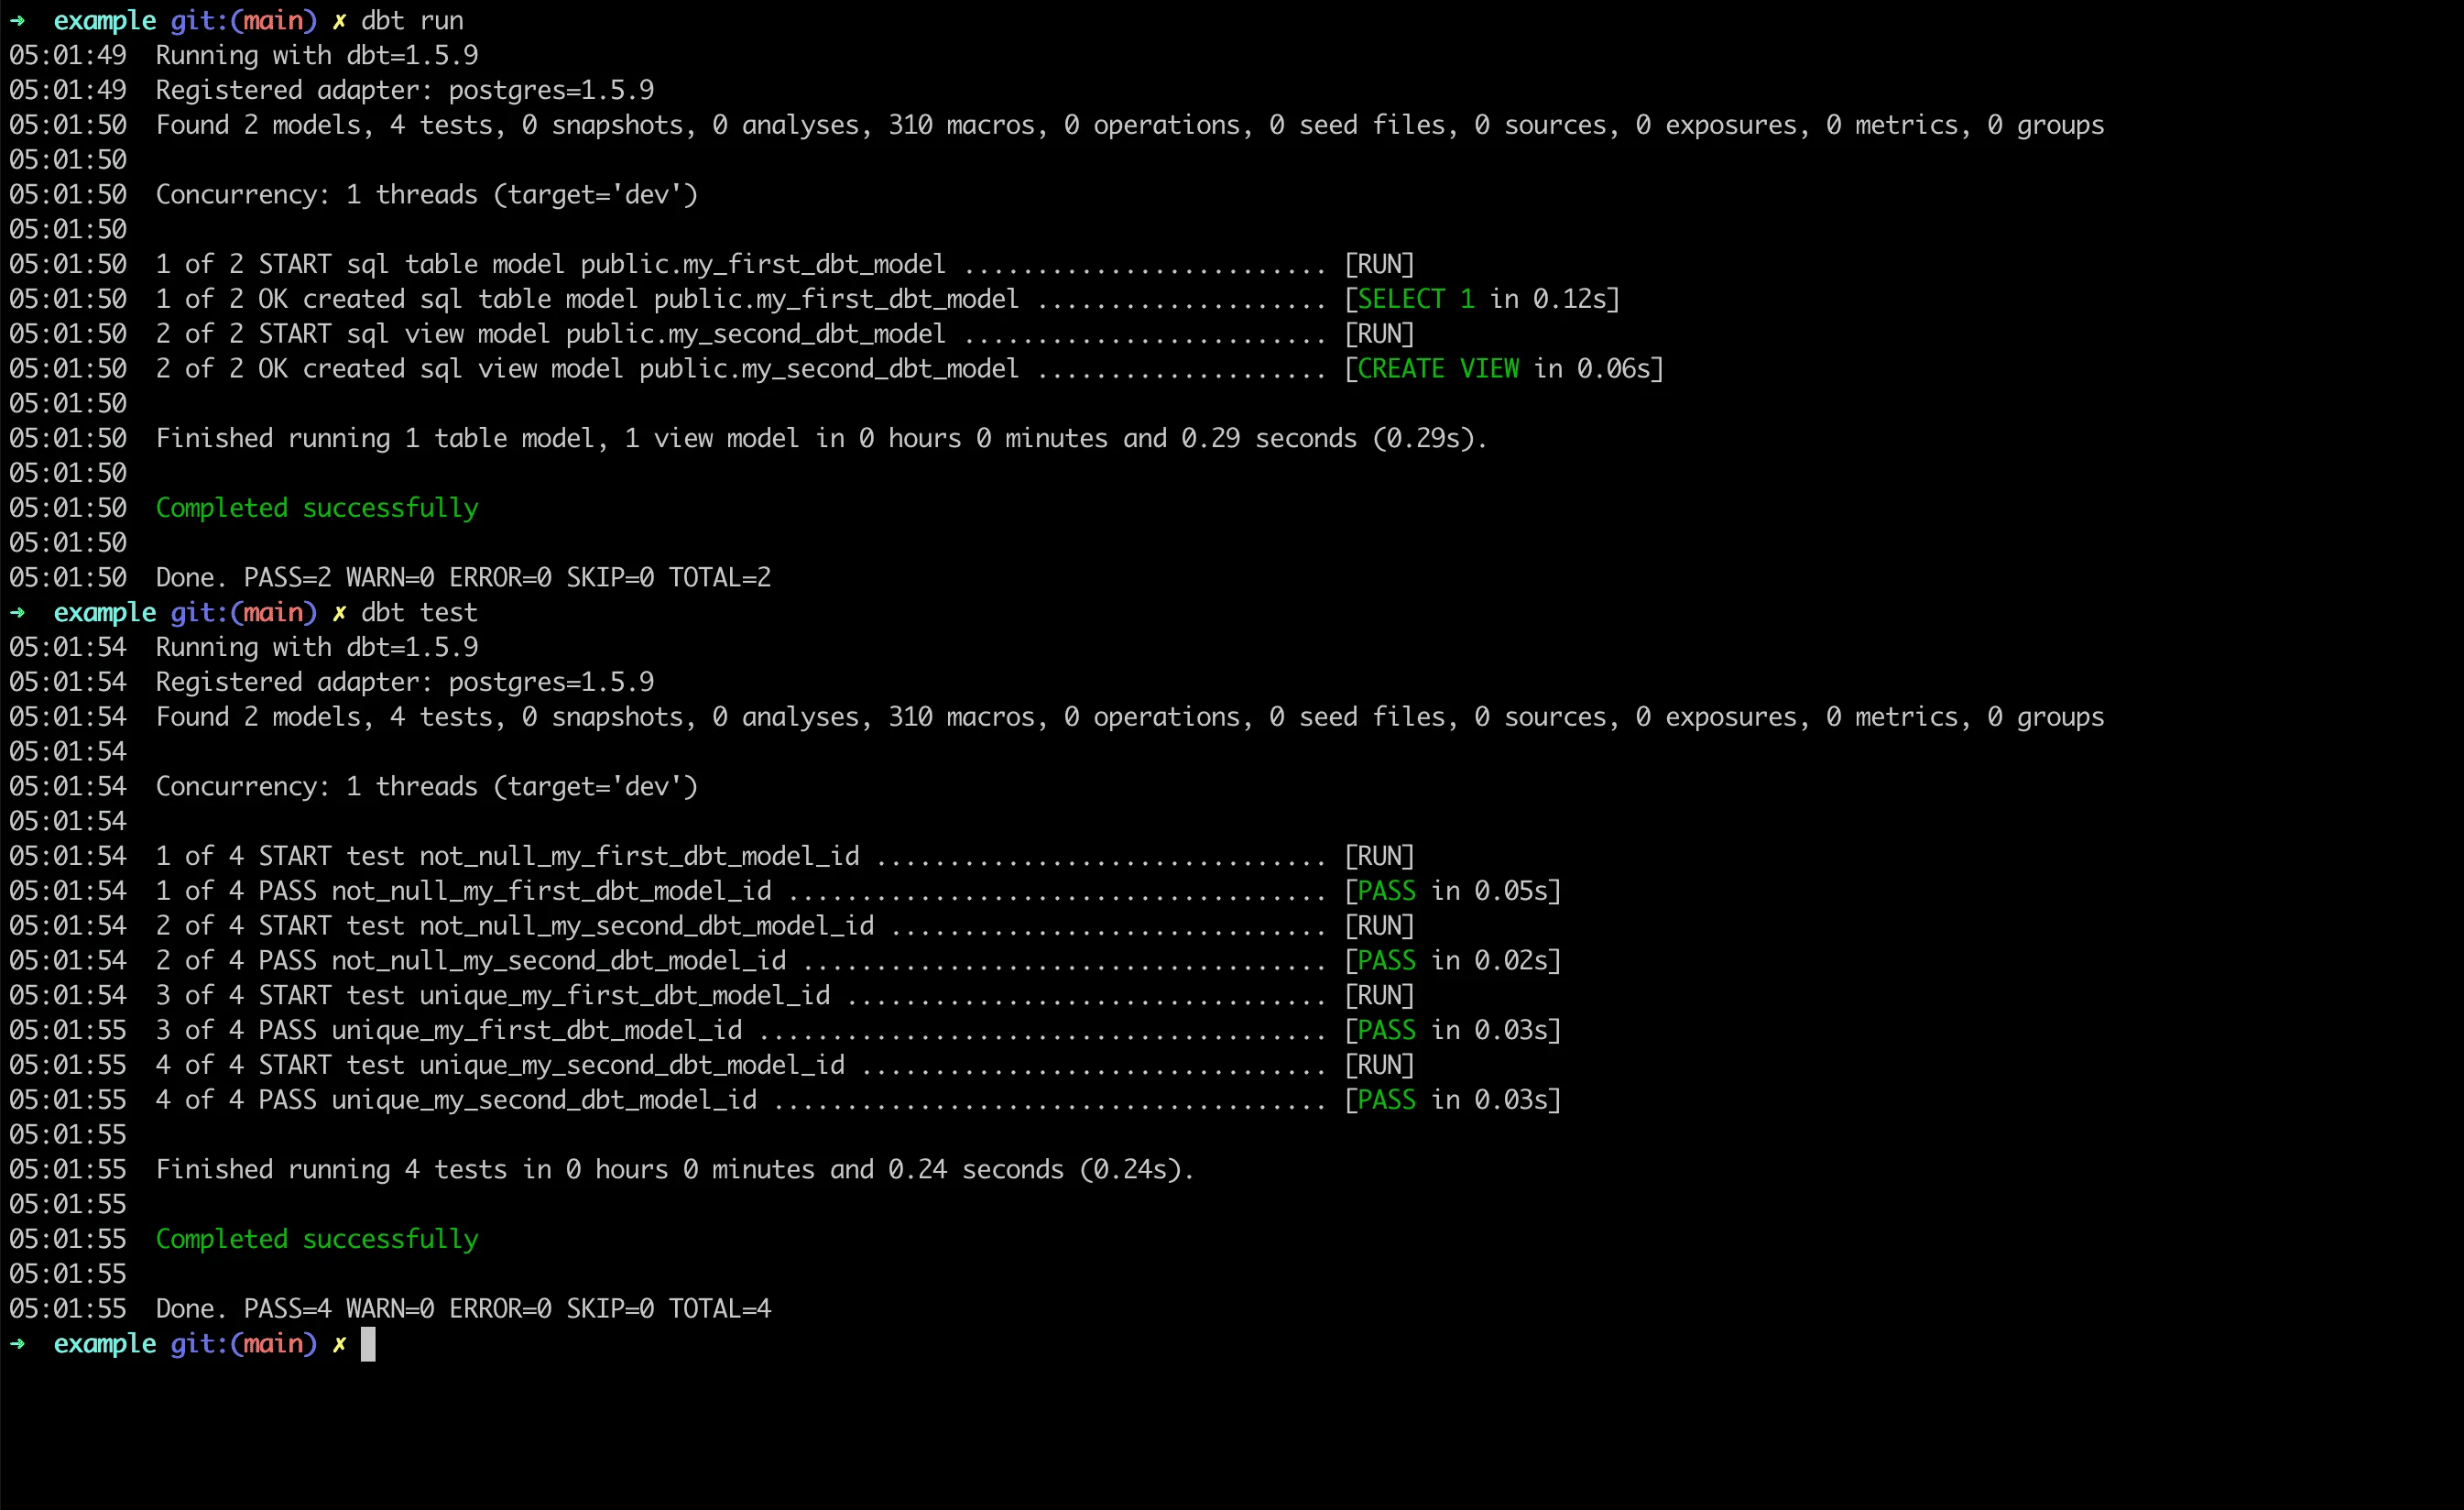
Loading Reference Data with Seeds
Seeds enable you to load CSV files as reference tables. Create seed files in the seeds/ directory.
- Create
seeds/raw_customers.csv:
id,first_name,last_name
1,Michael,P.
2,Shawn,M.
3,Kathleen,P.
4,Jimmy,C.
5,Katherine,R.
6,Sarah,R.
7,Martin,M.
8,Frank,R.
9,Jennifer,F.
10,Henry,W.- Create
seeds/raw_orders.csv:
id,user_id,order_date,status
1,1,2018-01-01,returned
2,3,2018-01-02,completed
3,4,2018-01-04,completed
4,1,2018-01-05,completed
5,5,2018-01-05,completed
6,3,2018-01-06,completed
7,4,2018-01-07,completed
8,6,2018-01-08,returned
9,9,2018-01-09,completed
10,10,2018-01-10,completed- Create
seeds/raw_payments.csv:
id,order_id,payment_method,amount
1,1,credit_card,1000
2,2,credit_card,2000
3,3,coupon,100
4,4,coupon,2500
5,5,bank_transfer,1700
6,6,credit_card,600
7,7,credit_card,1600
8,8,credit_card,2300
9,9,bank_transfer,2300
10,10,credit_card,0- Load the data:
dbt seed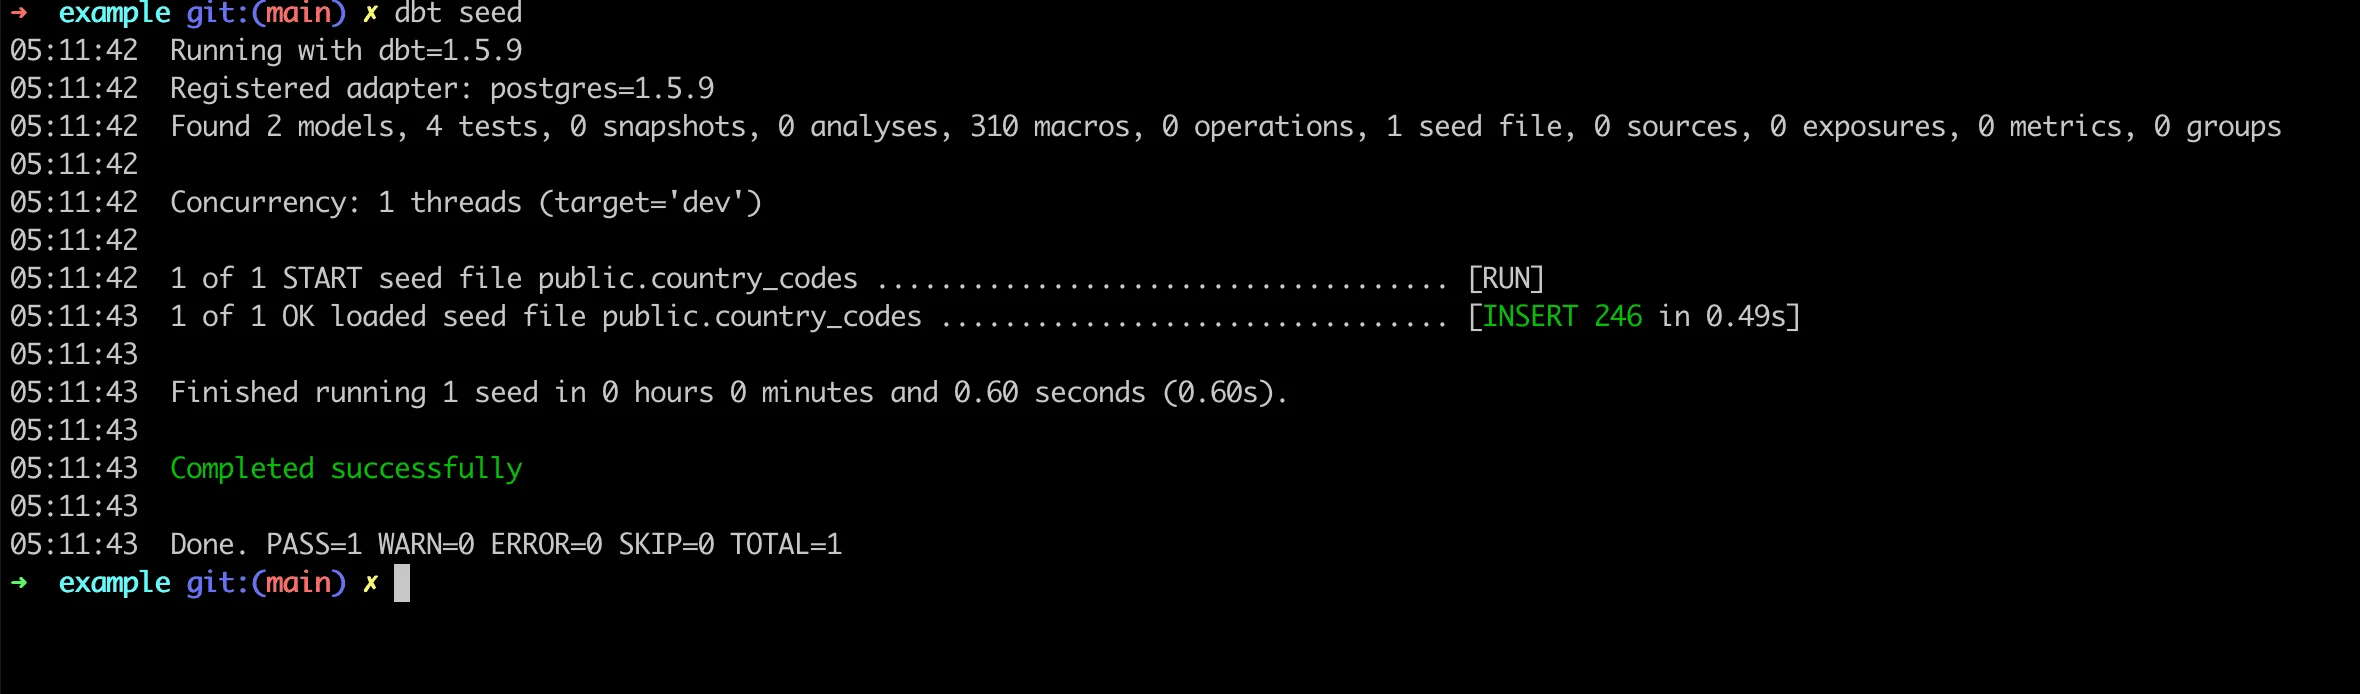
Verify the loaded data using psql:
\d+ raw_customers
SELECT * FROM raw_customers LIMIT 10;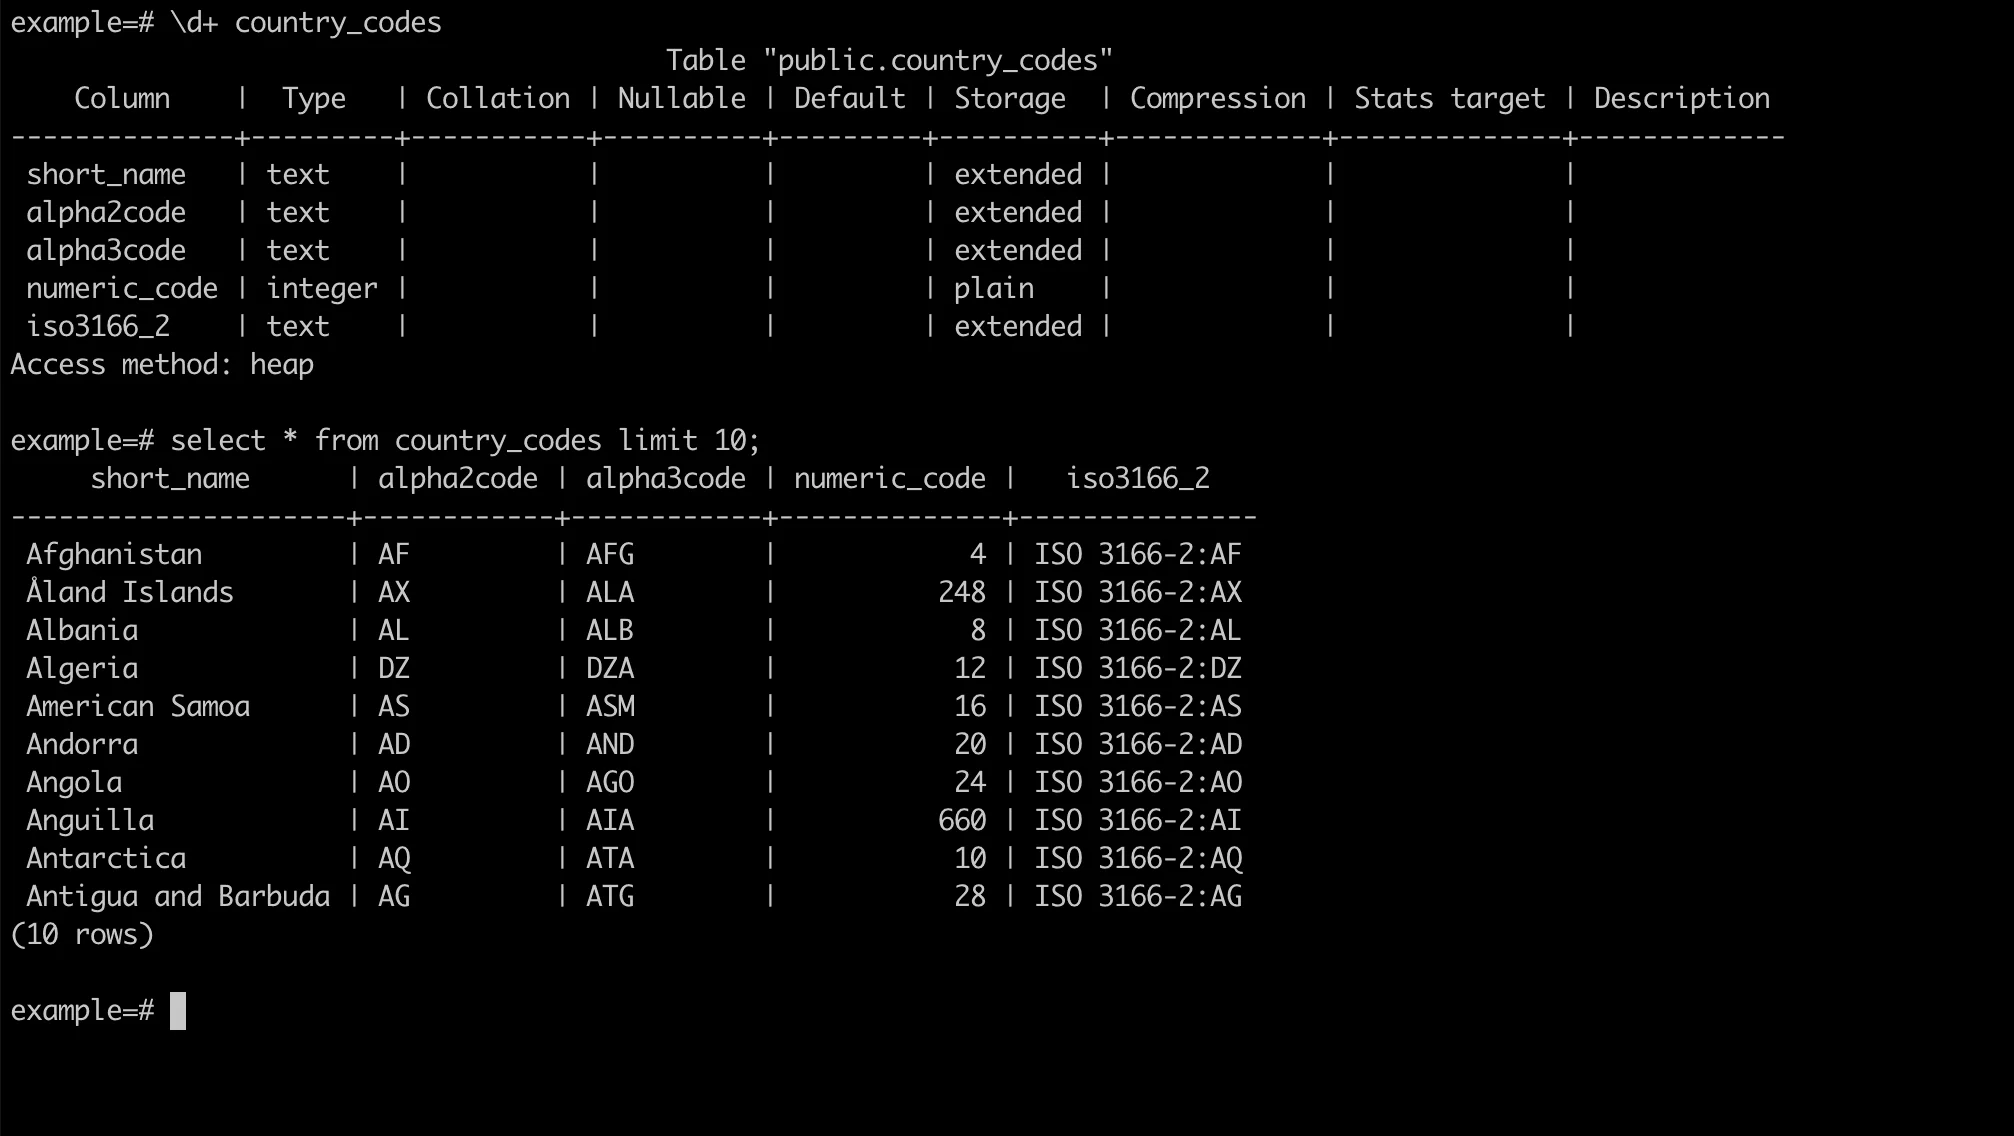
Creating Custom Tests
Implement custom data quality tests for business-specific validation rules:
- Define test configuration in
seeds/schema.yml:
version: 2

seeds:
  - name: raw_customers
    columns:
      - name: id
        tests:
          - unique
          - not_null
      - name: first_name
        tests:
          - not_null
          - count_between:
              range_left: 5
range_right: 100- Create custom test macro in
tests/generic/count_between.sql:
{% test count_between(model, column_name, range_left, range_right) %}

WITH agg_result AS (
    SELECT COUNT({{ column_name }}) AS record_count
    FROM {{ model }}
),
validation_result AS (
    SELECT *
    FROM agg_result
    WHERE record_count NOT BETWEEN {{ range_left }} AND {{ range_right }}
)

SELECT * FROM validation_result

{% endtest %}- Execute the custom test:
dbt test --select raw_customers
Building Production Models
Create production-ready models with proper source definitions:
- Define source schema in
models/staging/schema.yml:
version: 2

sources:
  - name: jaffle_shop
    database: example
    schema: public
    tags: ['raw', 'source']
    tables:
      - name: raw_customers
        description: 'Raw customer data'
        columns:
          - name: id
            description: 'Unique customer identifier'
          - name: first_name
            description: 'Customer first name'
          - name: last_name
            description: 'Customer last name'
      - name: raw_orders
        description: 'Raw order data'
        columns:
          - name: id
            description: 'Unique order identifier'
          - name: user_id
            description: 'Customer ID reference'
          - name: order_date
            description: 'Order placement date'
          - name: status
            description: 'Order status'
      - name: raw_payments
        description: 'Raw payment data'
        columns:
          - name: id
            description: 'Unique payment identifier'
          - name: order_id
            description: 'Order ID reference'
          - name: payment_method
            description: 'Payment method used'
          - name: amount
description: 'Payment amount in cents'- Create staging model in
models/staging/stg_customers.sql:
-- Staging layer: clean and standardize customer data
{{ config(materialized='view') }}

SELECT
    id AS customer_id,
    first_name,
    last_name,
    first_name || ' ' || last_name AS full_name
FROM {{ source('jaffle_shop', 'raw_customers') }}- Create staging model in
models/staging/stg_orders.sql:
-- Staging layer: clean and standardize order data
{{ config(materialized='view') }}

SELECT
    id AS order_id,
    user_id AS customer_id,
    order_date,
    status
FROM {{ source('jaffle_shop', 'raw_orders') }}- Create mart model in
models/marts/dim_customers.sql:
-- Mart layer: customer dimension with order metrics
{{ config(materialized='table') }}

WITH customers AS (
    SELECT * FROM {{ ref('stg_customers') }}
),

orders AS (
    SELECT * FROM {{ ref('stg_orders') }}
),

customer_orders AS (
    SELECT
        customer_id,
        MIN(order_date) AS first_order_date,
        MAX(order_date) AS most_recent_order_date,
        COUNT(order_id) AS number_of_orders
    FROM orders
    GROUP BY customer_id
)

SELECT
    customers.customer_id,
    customers.first_name,
    customers.last_name,
    customers.full_name,
    customer_orders.first_order_date,
    customer_orders.most_recent_order_date,
    COALESCE(customer_orders.number_of_orders, 0) AS number_of_orders
FROM customers
LEFT JOIN customer_orders ON customers.customer_id = customer_orders.customer_id- Execute the models:
dbt run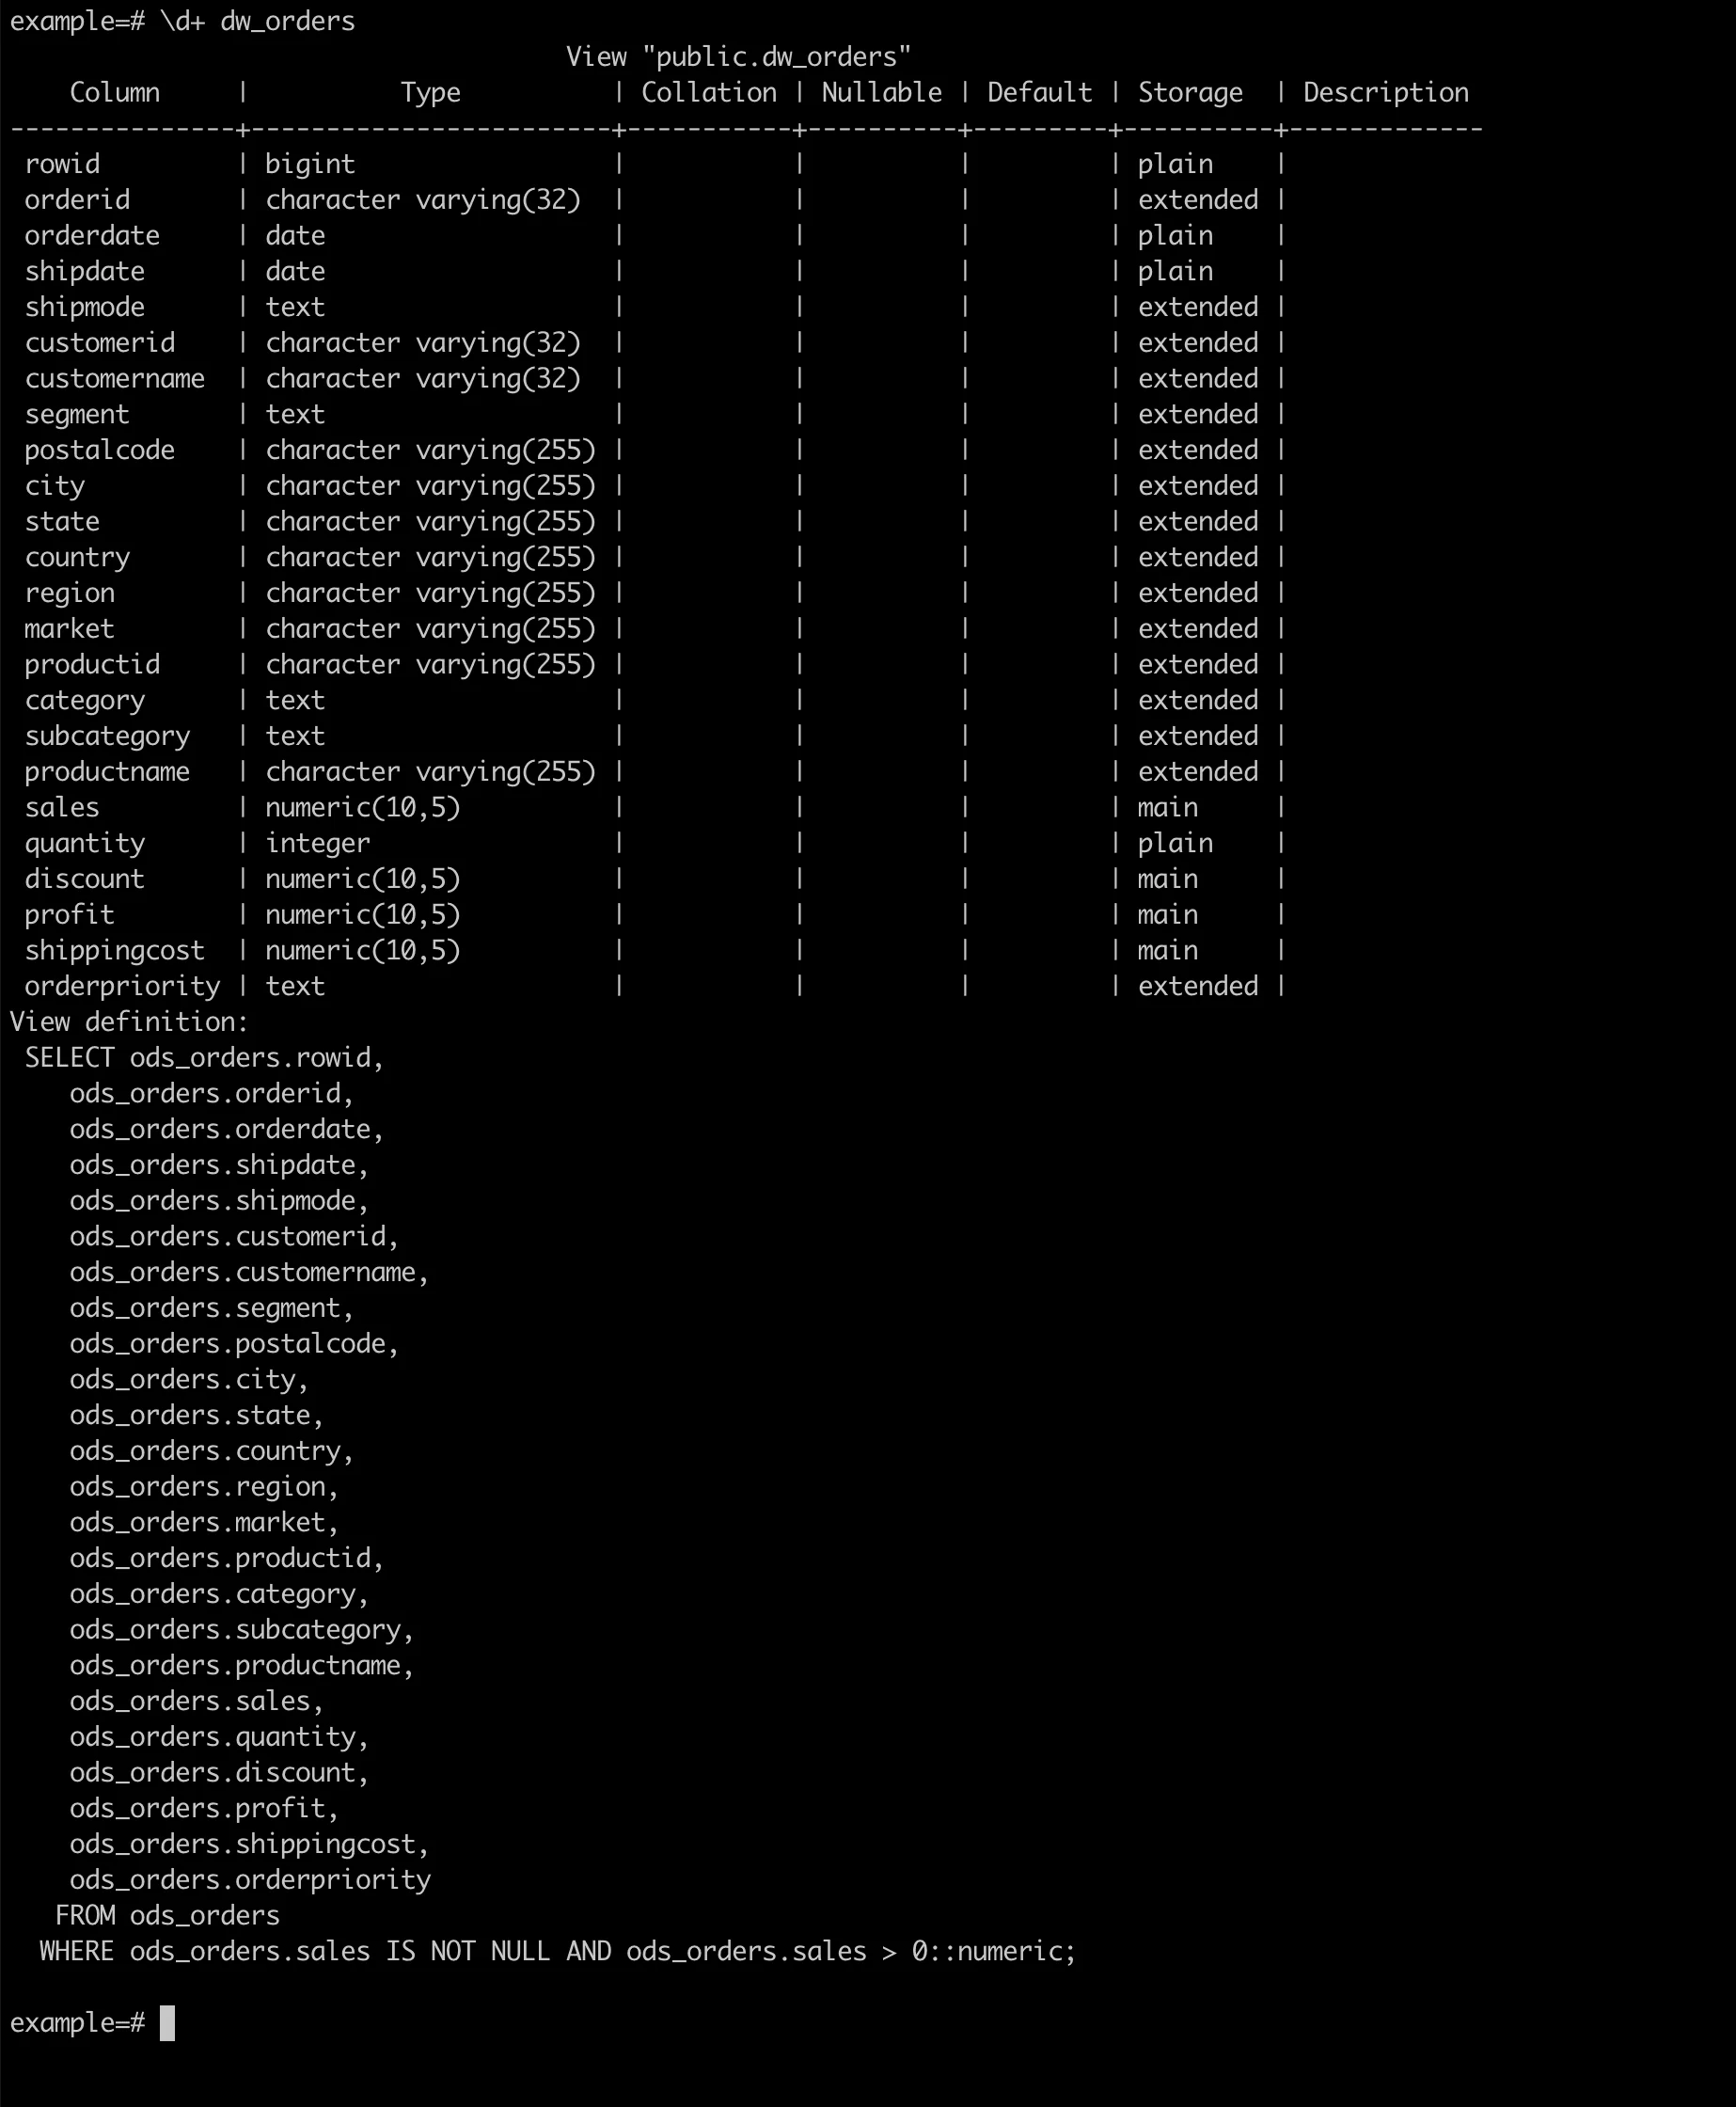
Documentation Generation
Generate comprehensive documentation for your data models:
- Build documentation:
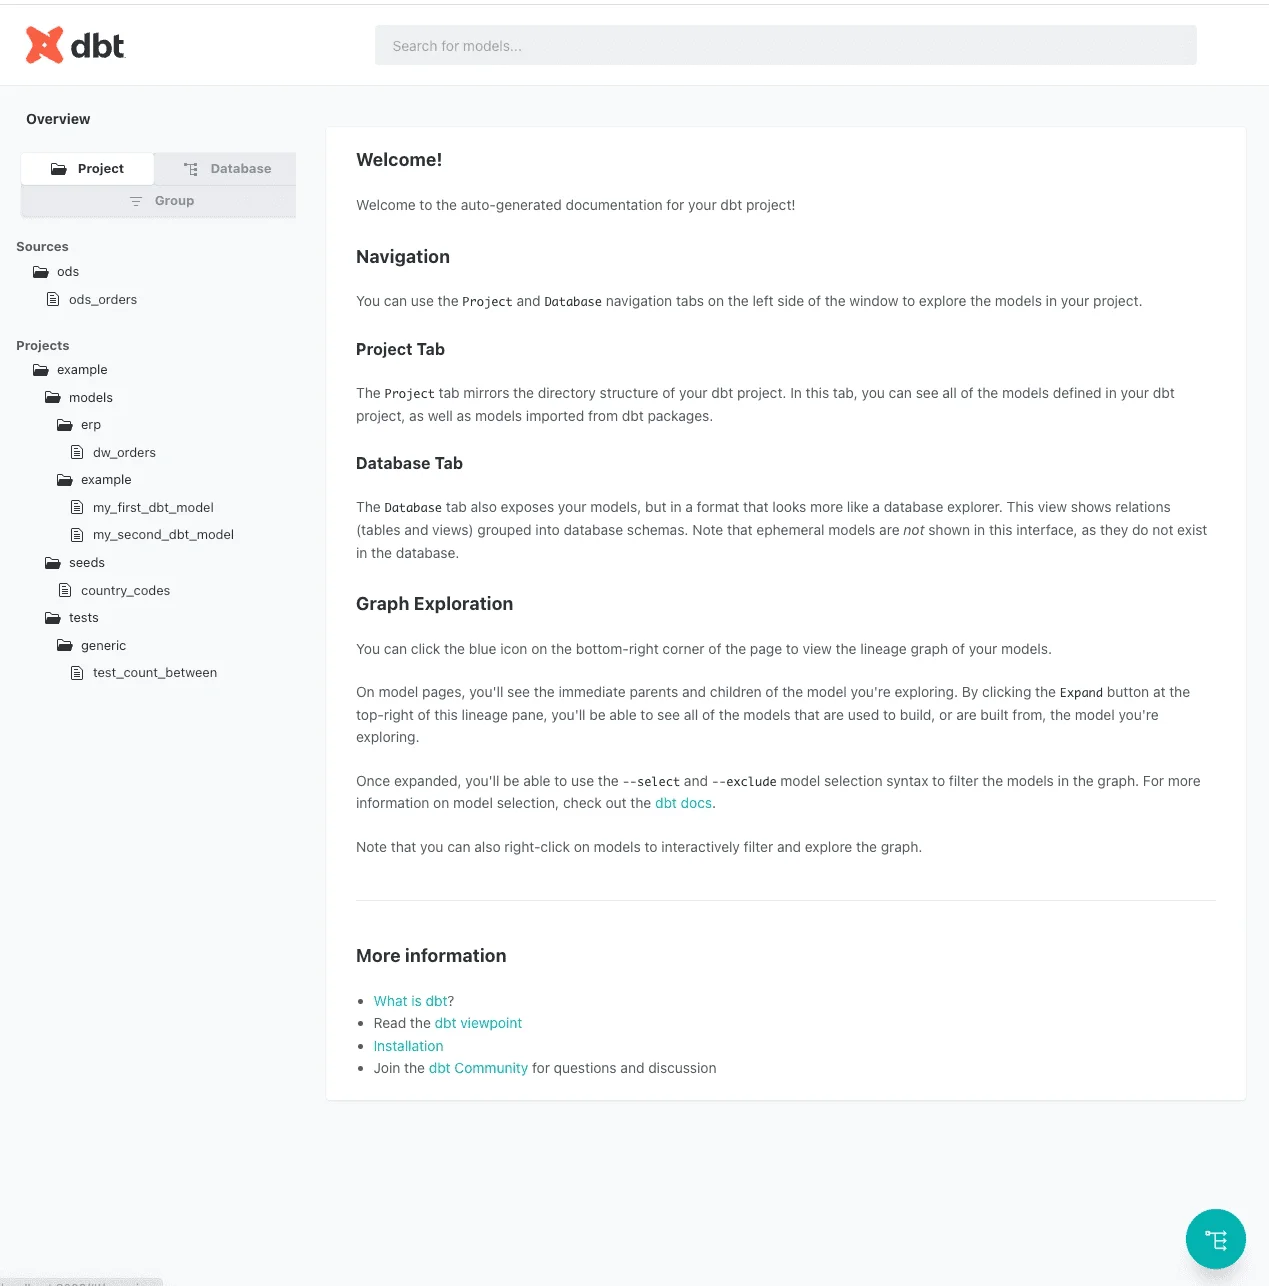
dbt docs generate- Serve documentation locally:
dbt docs serveThe documentation includes interactive lineage graphs and detailed model descriptions:
Production Configuration
Database Connection Setup
Configure your production connection in profiles.yml:
File Location:
- macOS/Linux:
$HOME/.dbt/profiles.yml - Windows:
C:\Users\<username>\.dbt\profiles.yml
Configuration:
jaffle_shop:
  outputs:
    dev:
      type: postgres
      threads: 4
      host: <your-tacnode-host>
      port: 5432
      user: <your-username>
      pass: <your-password>
      dbname: example
      schema: public
      keepalives_idle: 0
      connect_timeout: 10
      retries: 1

    prod:
      type: postgres
      threads: 8
      host: <your-production-host>
      port: 5432
      user: <your-prod-username>
      pass: <your-prod-password>
      dbname: example
      schema: public

  target: dev
Best Practices
Model Organization
- Staging Models: Clean and standardize raw data
- Intermediate Models: Business logic and joins
- Mart Models: Final tables for analytics and reporting
Performance Optimization
- Use
{{ config(materialized='table') }}for frequently accessed models - Implement incremental models for large datasets
- Add appropriate indexes in post-hooks
Data Quality
- Implement comprehensive testing at each layer
- Use custom tests for business-specific validation
- Monitor test results in CI/CD pipelines
Documentation
- Maintain detailed descriptions for all models and columns
- Include business context and assumptions
- Keep documentation current with code changes
Additional Resources
- dbt Labs Jaffle Shop - Official sample project
- dbt Documentation - Complete dbt reference
- dbt Best Practices - Official best practices guide